Admin products options page
- Overview
- Accessing the product options
- Setting up a new product option
- Adding a text input option
- Assigning a product option to a product
- Frequently asked questions
Overview
Product options allow your customers to choose specific attributes or add-ons for each product. This would typically be an item of clothing offered in various colors or a build your own computer system where the buyer can choose the processor, memory, monitor etc. Any price changes are shown in real time - it is also possible to plug-in the weight difference if applicable so shipping can be calculated correctly. Version 4.9.0 saw the introduction of a feature allowing the product option to have its own product id.
Accessing the Product Options
Select the “product options” link from the left hand menu of your control panel.

From this screen you can clone, modify or delete an existing product option or add a new one. There is also the possibility to add a New Text Input Option.
Setting up a new Product Option
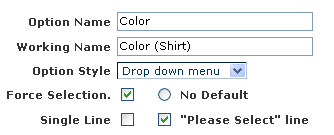
Click on New Option and you should see a screen with this at the top:

The Screen Explained
Option Name: This is the name that is displayed on the products page next to the product it relates to.
Working Name: This is for internal use only and helps identify the product option in the admin section. It may be that you have different product options for colors depending on the product eg different colors available for socks and shoes.
Option Style: Choose to show your product options as a drop down menu, radio buttons or Multiple Purchase.
The Multiple Purchase feature was introduced in Version 5.5.0 and allows customers to select different quantities of product options from the same page before adding them all to cart. It will appear on the product and / or product detail page like this:

The number of columns displayed is set in vsadmin/includes.php
$multipurchasecolumns=3;
No default: Select here if there is no default product option to be shown.
Single line: Select here if you want the options to appear on the same line rather than one below another.
"Please Select" line: If selected this will show the message "Please Select" before the product options.
Force Selection: Check this box if you want to force the customer to select a product option for the product they are purchasing.
Below that box, you should see a screen like this

The Screen Explained
Click on the Plus button to enter a new product option anywhere in the list
Options / Values: These are the product options that will appear with the product it has been assigned to.
Price Diff: If there is a price difference associated to the product option then it can be added here. For example if the option costs $1 more than the base product price then place "1" in the Price Diff box. If the option costs 10% more than the base product price then check the percentage box and place "10" in the Price Diff box.
Wholesale Price: If you are using wholesale pricing and there is a difference in price involved then they can be entered here.
Weight Diff: If there is a weight difference associated to the product option then it can be added here. For example if the option weighs 1 kilo over the base product weight then place "1" in the Weight Diff box. If the option weighs 10% more than the base product weight then check the percentage box and place "10" in the Weight Diff box.
Select Options / Alternates to continue configuring the product options

The Screen Explained
Alt Prod ID: Version 4.9.0 saw the introduction of this feature. It is now possible for the product option to have its own product ID. This can simply be a substitute product id, for instance if the product id is "product1", the you can enter "product2" for the Alt Prod ID if you require this product option to change the product id to "product2".
IMPORTANT NOTE: Please note that the substitute product id must exist in the database. You must create it as normal on the product admin page, and if you don't want it to show separately uncheck the "Display Product" checkbox. If you enter an alt product id that doesn't exist as a separate product it will show as out of stock.
Advanced changes can also be made with the Alt Prod ID. Any instance of %s will be replaced with the original product id. For instance if the Alt ID is "%s_red" and the original id is "product1" then the result would be "product1_red". This is very useful when applying the same change to multiple products.
Another advanced feature is "search and replace" in the product id. If you have a space in the Alt Prod ID, anything to the left will be searched for in the product id, and replace with whatever is to the right of the space. An example would be an Alt ID of "MARKER red" and a product id of "product_MARKER_42" which would yield "product_red_42". This can be very useful when dealing with multiple options that all modify the product id.
Alt Image: From version 5.5.0 you can assign different images with the product option choices. This means that as a customer selects a product option the image will change accordingly. In this field you should place the path to the image you want to appear on the products page when an option is selected.
Alt Large Image: This is where you would place the path to the image that would show on the product detail page once an option has been selected.
Adding a Text Input Option
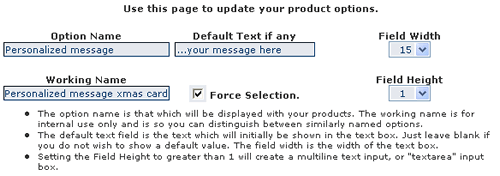
The text input option is used when you need the customer to add some information regarding the product. This might be a personalized message added to the product or if you are selling domain names, the domain that the customer wishes to buy.

The Screen Explained
Option Name: This is the name of the option that will appear on your store.
Working Name: This is for internal use only and is useful when you have options that could have the same name.
Default Text if any: If you need to populate the field on the store then add the message here. If not then leave blank.
Force Selection: Check this box if you want to force the customer to add some text to the box.
Field Width: The width of the box that will appear on the store.
Field Height: If you set this to a number higher then one then you will create a multiline box, useful when loner input is required.
Assigning a Product Option to a Product
Once you have set up the product options you need you can then assign them to their corresponding products. From the left hand menu select Product Admin and then Modify for the product that needs a new option. On the products admin page you should see a box where you can specify how many different product options (eg color, size) need to be assigned to the product.
![]()
Once you assign the number then the corresponding number of drop down choices will appear so you can select the options that need to go with that product.
Frequently asked questions
How can I hide the product options from the products page?
How can I hide the display of the price difference for the product options?
How can I hide the product options from the products page?
For the ASP version add noproductoptions=true to includes.asp
For the PHP version add $noproductoptions=TRUE; to includes.php
How can I hide the display of the price difference for the product options?
For the ASP version add hideoptpricediffs=true to includes.as
For the PHP version add $hideoptpricediffs=true; to includes.php

