Cascading style sheets - CSS
On the Ecommerce Templates we use cascading style sheets (css) to allow you to easily manage the various formatting properties. In the root of your web you will have a file typically called style.css and on each page a link to it like this <LINK REL=STYLESHEET TYPE="text/css" HREF="style.css">. This can be edited in Frontpage or Dreamweaver by double clicking on it.
- Editing hyperlink properties
- Editing font properties
- Editing the horizontal rule
- Using CSS classes
- Editing the category layout
- Editing the mini cart and mini login
- Editing the price color
- Editing the product option properties
- Editing the top product navigation
- Editing the table backgrounds
- Editing the page numbers
- Editing the alternative currency
- The product detail page
- The product page
- The number of items in stock message
- Editing the productbody3 display
- Editing he list price display
- Editing the cart thumbnail image
- Editing link properties in the store pages
- Editing the sku properties
- Editing the manufacturer properties
- Editing the product reviews and ratings format
- Extra image classes
- Editing the giant image name
- Further reading
Editing the hyperlink properties with CSS
After double clicking on the file you should see some lines like this:
A:link {
color: #3366FF;
text-decoration: none;
}
A:visited {
color: #3366FF;
text-decoration: none;
}
A:active {
color: #3366FF;
text-decoration: none;
}
A:hover {
color: #FF9966;
text-decoration: none;
}
The parameters are pretty clear, any hex value will suffice for the color and if you require an underline when the cursor passes over a link, change "none" to "underline". Note that some browsers, notably Netscape 4x will ignore the hover option.
Editing the font properties with CSS
The font type and size is also set in the css file, here's an example:
TD {
font-size: 12px;
font-family : Verdana,Arial;
}
P {
font-size: 12px;
font-family : Verdana,Arial;
}
This means that all text that is between <TD> or <P> tags will be Verdana, size 12 - if Verdana is not installed on the user's machine then it will revert to Arial. If you want to change the color of the text from the default then add a line like this for red text:
TD {
font-size: 12px;
font-family : Verdana,Arial;
color: #CC0000;
}
P {
font-size: 12px;
font-family : Verdana,Arial;
color: #CC0000;
}
Editing the horizontal rule properties with CSS
This line of code will give you a blue horizontal rule, one pixel in height:
HR {
height: 0;
border-width: 1px 0 0 0;
border-style: solid;
border-color: #006AC8;
}
Using CSS classes
CSS classes allow you to vary your styles on a page, for example giving a section smaller text or different link properties - this can be really handy when for example you have light and dark backgrounds and you need your links to show up well on both. Here's an example of using a class for hyperlink properties:
A.dark:link {
color: #FFFFFF;
text-decoration: none;
}
A.dark:visited {
color: #FFFFFF;
text-decoration: none;
}
A.dark:active {
color: #FFFFFF;
text-decoration: none;
}
A.dark:hover {
color: #FF9966;
text-decoration: none;
}
This will give you white links with an orange mouseover. To apply it to individual links you'll need to add the class like this:
<a class="dark" href="mylink.html">link text</a>
To change text size or color between <TD> or <P> tags you might have something like this:
TD.smaller {
font-size: 11px;
font-family : Verdana;
color : #CC0000;
}
P.smaller {
font-size: 11px;
font-family : Verdana;
color : #CC0000;
}
This will give you red 11 pixel size text when you add a class like this for a paragraph:
<p class="smaller">
...or for the cell
<td class="smaller">
Editing the category layout
In version 4.1.0 we added the possibility of showing the categories in multiple columns rather than in one vertical list. As people will want to align the text and images in different formats, we added CSS classes to make the modifications as simple as possible.
The first thing you will want to do is set up the category format that best suits your site, this involves adding a parameter to your vsadmin/includes.asp or vsadmin/includes.php files, depending on your version.
Next thing to do is open your CSS file, this is found in the root of your store and is typically called style.css or stylesheet.css
Copy and paste these lines into the CSS file:
P.catname {
text-align: center;
margin-top: 0px;
margin-bottom: 4px;
vertical-align:top;
}
P.catdesc {
margin-top: 0px;
margin-bottom: 4px;
vertical-align:top;
}
IMG.catimage {
border:1px;
border-thickness: 1px;
border-color: #000;
border-style: solid;
vertical-align:top;
}
TD.catimage {
vertical-align:top;
}
TD.catname {
vertical-align:top;
text-align: center;
}
TD.catnavigation {
vertical-align:middle;
text-align: left;
}
The classes explained
P.catname: The alignment of the category name
P.catdesc: The alignment of the category description
IMG.catimage: The properties of the category image
TD.catimage: The alignment of the category image
TD.catname: The alignment of the category name
TD:catnavigation: The alignment of the top category navigation
P.navdesc: The properties of the text "View all products in all categories". (introduced in version 4.9.0)
div.catdiscounts: The properties of the discounts text on the category pages. (introduced in version 5.2.6)
Some examples
Using the settings as listed above would show the category page as in the example here:

If you would like the titles and text left aligned and without an image border, the CSS would need to be changed like this:
P.catname {
margin-top: 0px;
margin-bottom: 4px;
vertical-align:top;
text-align: left;
}
P.catdesc {
margin-top: 0px;
margin-bottom: 4px;
vertical-align:top;
}
IMG.catimage {
border:0px;
border-thickness: 1px;
border-color: #000;
border-style: solid;
vertical-align:top;
}
TD.catimage {
vertical-align:top;
}
TD.catname {
vertical-align:top;
text-align: left;
}
TD.catnavigation {
vertical-align:middle;
text-align: left;
}
...and the layout would look like this:

To move the top navigation to the right, change
TD.catnavigation {
vertical-align:middle;
text-align: left;
}
to
TD.catnavigation {
vertical-align:middle;
text-align: right;
}
The best thing is to play around with the settings until you find the one that best suits your site. You can always come back here to get the default settings if you run into difficulty.
Editing the mini cart and mini login
There are two CSS classes that can be used in conjunction with the mini cart and mini login. If you purchased a template with the mini cart incorporated then these classes should already be present in style.css, if not you can add these (Please note the class is called mincart, not minicart:
TD.mincart {
font-size: 10px;
font-family : Verdana;
}
P.mincart {
font-size: 10px;
font-family : Verdana;
}
This will make the text size 10px and the font Verdana.
Editing the price color
In version 4.1.6 we added the possibility of changing the color of the price from the style sheet. All you need to do is add the following to style.css, this example would make the price show as red:
SPAN.price {
COLOR: #FF0000;
}
Editing the product options properties
In version 4.2.0 we added the possibility of changing the format of the product options from the style sheet. All you need to do is add the following to style.css, this example would make the text show as red with Verdana 11px font:
SELECT.prodoption {
font-size: 11px;
font-family : Verdana;
color : #FF0000;
}
If you are using stock management with the product options, introduced in version 4.4.0, it's possible to "grey out" the options which are no longer in stock by adding the following to your main style.css file
OPTION.oostock {
color : #A0A0A0;
}
If you want to edit the text that introduces the product option then you need these classes (Version 5.2.2 required)
SPAN.prodoption {
font-size: 11px;
font-family : Verdana;
color : #FF0000;
}
SPAN.detailoption {
font-size: 11px;
font-family : Verdana;
color : #FF0000;
}
To format the multi-options introduced in version 5.5.0, use the following class
SPAN.multioption {
font-size: 11px;
font-family : Verdana;
color : #FF0000;
}
This will change the text to red that accompanies the quantity boxes in the multi option feature on the product and product detail pages.
Editing the top product navigation
In version 4.6.0 we added the possibility of changing the format of the top product navigation eg. Home >> Product from the style sheet. All you need to do is add the following to style.css, this example would make the text show as red with Verdana 11px font:
td.prodnavigation {
font-size: 11px;
font-family : Verdana;
color : #A0A0A0;
}
P.prodnavigation {
font-size: 11px;
font-family : Verdana;
color : #A0A0A0;
}
Editing the table backgrounds
Version 4.7.0 allows you to set the table and cell background properties in the files search / tracking / order status / checkout via CSS classes.
The new classes are:
TABLE.cobtbl for the table.
TD.cobhl for the cell highlights
TD.cobll for the cell lowlights
For example the following addition to your style.css file would give you a search table looking like this:

TABLE.cobtbl{
background-color: #FF0000;
}
TD.cobhl{
background-color: #FFC42B;
}
TD.cobll{
background-color: #FFF7B8;
color : #666666;
}
Editing the page numbers
In version 4.7.0 we added the possibility of changing the format of the page numbers from the style sheet. All you need to do is add the following to style.css, this example would make the page numbers show as Verdana size 12:
P.pagenums {
font-size: 12px;
font-family : Verdana;
}
In version 5.1 you can also change the appearance of the page number currently being viewed for example
SPAN.currpage {
color: #FF0000;
font-weight: bold;
}
...would show a page number bold and in red like this:
![]()
Editing the currency format
In version 4.7.0 we also included the possibility of changing the format of the alternative currencies. All you need to do is add the following to style.css, this example would make the currencies show in Verdana, size 10 and gray:
SPAN.extracurr {
font-size: 10px;
font-family : Verdana;
color: 666666
}
The product detail page
In version 4.9.0 we added some new classes which are specific to the product detail page:
div.detailid: The properties of the text "Product ID"
div.detailname: The properties of the product name on the product detail page
div.detaildiscounts: The properties of the discounts text for the product detail page
td.detailimage: The alignment of the product image on the product detail page
img.prodimage: The properties of the product image
div.detaildescription: The properties of the text in the long product description
div.detailoptions: The properties of the product options on the product detail page
div.detailprice: The properties of the price on the product detail page
div.detailcurrency: The properties of the alternative currencies on the product detail page
The product page
In version 4.9.0 we added some new classes which are specific to the product page:
div.prodid: The properties of the text "Product ID"
div.prodname: The properties of the product name on the product page
div.proddiscounts: The properties of the discounts text for the product page
td.prodimage: The alignment of the product image on the product page
img.prodimage: The properties of the product image
div.proddescription: The properties of the text in the short product description
div.prodoptions: The properties of the product options on the product page
div.prodprice: The properties of the price on the product page
div.prodcurrency: The properties of the alternative currencies on the product page
Editing the number of items in stock message
In version 5.0.0 we added the ability to show the number of items in stock in the products page. This is the class that governs the look of the entry.
div.prodinstock {
font-size: 10px;
font-family : Verdana;
color: 666666
}
Editing the productbody3 display
In version 5.0.0 we added a new product layout, which by default should look something like this
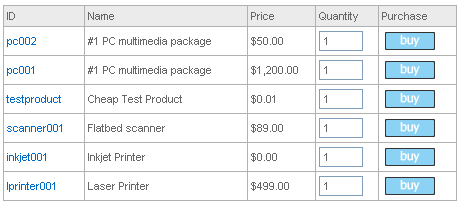
The set up of this layout requires the productbody3 setting in includes.asp or includes.php
These are the classes associated with the display
table.cpd - outer table background color which forms the outlines of the cells
td.cpdll - cell background
td.cpdhl - header background
div.cpdhlid - product id header
div.cpdhlimage - product image header
div.cpdhlname - product name header
div.cpdhldescription - product description header
div.cpdhldiscounts - discounts header
div.cpdhllistprice - list price header
div.cpdhlprice - price header
div.cpdhlpriceinctax - price including tax header
div.cpdhlinstock - number in stock header
div.cpdhloptions - product options header
div.cpdhlquantity - quantity box header
div.cpdhlbuy - buy button header
div.prod3id - product id properties
div.prod3name - product name properties
div.prod3discounts - discounts properties
div.prod3description - product description properties
div.prod3listprice - list price properties
div.prod3price - price properties
div.prod3pricetaxinc - price including tax properties
div.prod3instock - number in stock properties
div.prod3quant - quantity box properties
div.prod3buy - buy button properties
For example to have a table looking like this
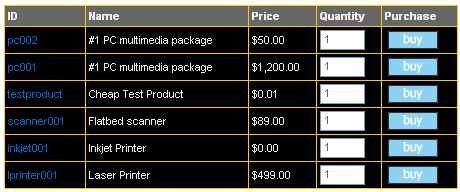
You would need to add this to style.css
.cpd {
background : #FFCC00;
}
.cpdll {
background : #000;
color: #F0F0F0;
}
.cpdhl {
background : #666;
color: #F0F0F0;
font-weight: bold;
}
Editing the list price display
In version 5.1.3 we added the possibility of editing the list price display, typically people would want to center the text like this:
div.listprice {
text-align: center;
}
Please note that the strikethrough and font color are set in vsadmin/inc/languagefile.asp / .php
For the product detail page the class would be div.detaillistprice and was added in version 5.2.6
Editing the cart thumbnail image
Version 5.4 saw the introduction of adding a thumbnail image to the cart. This has its own class:
img.cartimage {
width: 100px;
border:1px;
}
Editing the link properties in the store pages
Version 5.4 also saw the addition of a new class for all links in the store and they can be set like this:
A.ectlink:link {
color: #333;
text-decoration: none;
}
A.ectlink:visited {
color: #333;
text-decoration: none;
}
A.ectlink:active {
color: #333;
text-decoration: none;
}
A.ectlink:hover {
color: #8D2800;
text-decoration: none;
}
Editing the sku properties
The SKU display introduced in Version 5.4 can be formatted like this for the product page:
div.prodsku {
color: #333;
}
... and for the product detail page:
div.detailsku {
color: #333;
}
Editing the manufacturer properties
The Manufacturer display was introduced in Version 5.5 and can be formatted like this for the product page:
div.prodmanufacturer {
color: #333;
}
... and for the detail page
div.detailmanufacturer {
color: #333;
}
If you want the same formatting on both the product and product detail page then just set the div.prodmanufacturer class.
Editing the product reviews and ratings format
These are the classes available for the product reviews and rating features introduced in Version 5.5.0.:
span.review reviewheader (the title of the review)
span.review numreviews (the number of reviews and average rating)
span.review showallreview (the text properties for the "Show all")
hr.review (the horizontal rule)
span.review clickreview (the text properties of the "Click review")
span.review reviewname (the name of the person and date of review)
span.review reviewcomments (the comments left for the review of the product)
To achieve the following layout
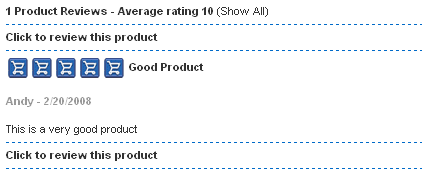
... add the following to your css file
.review {
color: #000;
font-weight: bold;
}
.showallreview, .reviewcomments {
color: #000;
font-weight: normal;
}
.reviewname {
color: #999;
font-weight: bold;
}
hr.review {
width: 100%;
text-align:left;
height: 0;
border-width: 1px 0 0 0;
border-style: dashed;
border-color: #006AC8;
}
Extra image classes
There are two classes associated with the extra images. This for example will control the formatting of the text "1 of 5"
span.extraimage{
color: #CC0000;
}
and this just for the first number
span.extraimagenum{
color: #000;
}
Giant images
The text associated with the giant image has two classes
.giantimgname{
background-color:blue;
}
will give the product name a blue background
.giantimgback{
background-color:yellow;;
}
will give the "Back to product page" text a yellow background.
Further reading
We've only scratched the surface here but we strongly recommend the use of CSS, for further reading take a look at this excellent site:

