Category Setup Overview
The multiple category system introduced in version 4.0.0 allows for a hierarchy of up to 10 sub levels and replaces the previous hierarchy of Top category > Sub category > Product. This means that you can tailor your store set up to meet the needs of your product requirements. Products can be added to several categories if necessary and you can have categories with the same name on your store but differentiate between them in your control panel by assigning unique "working names".
Accessing the Categories
Select the “categories” link from the left hand menu of your control panel.

The Screen Explained
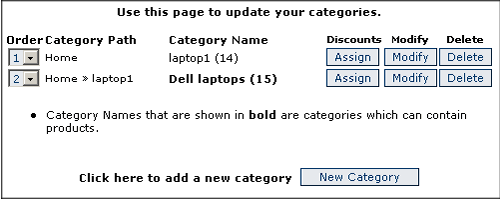
Order Category Path: This will give you the hierarchy of your category set up. The Home option refers to categories.asp / categories.php. The drop down option on the left allows you to order the categories on your store.
Category Name: This is the working name assigned to your category – it may be different from the name that appears on your store depending on the naming system you have chosen. Text in bold denotes a category that can have products added to it. The number in brackets (15) refers to the category id and is useful when manually setting up links on the store.
Discounts: Option to assign a Discount
Modify: Modify the properties of the Category
Delete: Delete a Category
Adding a New Category
Click on the New Category button

The Screen Explained
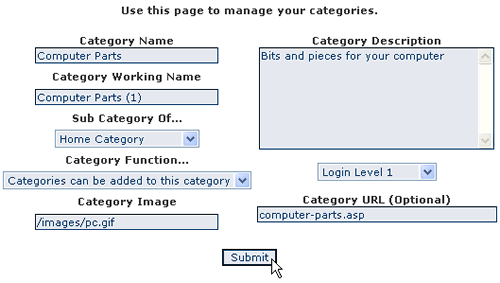
Category Name: This is the name of the category that will appear on your store.
Category Working Name: This is for internal use only and is useful when you have categories that could have the same name.
Sub Category Of…: This drop down allows you to choose the category above the one you are adding. In the example above, “Toshiba” will be a sub-category of “laptop1”.
Category Function: There are two options when setting up a new category. The category may have products added to it, in this case select “Products can be added to this category”. If there are to be further sub-categories in the hierarchy then select “Categories can be added to this category”. It will not be possible to add a product to a category that has subsequent sub-categories.
Category Image: This is an optional field where you would place the path to the image to accompany the category name.
Category Description: Also optional if you would like to describe the category to your users. It is possible to add HTML to this field.
Login level: This is an optional field where you can set the login level to be used in conjunction with the client login feature. It is also possible to disable a category (and all their products) rather than delete it so it can be put back at a later date. (Version 4.8.0 + required).
Category URL: Also optional if you would like to specify the static URL of the category which would have been set up using the search engine friendly features. This now means that your menu system won't pick up on the dynamic URLs as the store is browsed. It also works with the DHTML menu and avoids duplicate URLs / content on the store. (Version 4.8.4 + required).
Notes
Products can only be added to the last category in your hierarchy - these are shown in bold type in your categories admin page. Be sure that when creating sub categories you don’t get into a loop of categories when the "Top Category" of one of your categories links back to one of its own sub categories. If this occurs you will see the error message “LOOP”. You must fix this before adding more categories / products.

